How to Craft an Enchanting Outdoor Kitchen Island
Elevate your al fresco dining experience with a captivating outdoor kitchen island that transforms your backyard into a culinary haven. Whether you relish intimate gatherings or grand feasts, this guide will empower you with the essential steps to construct an exquisite island that harmonizes aesthetics and functionality.
1. Plan Your Oasis:
Before embarking on the construction journey, meticulously envision your island's purpose and desired features. Consider how it will integrate with your existing outdoor space and complement your grilling or entertaining needs. Sketch a preliminary layout, marking the island's dimensions, shape, and placement of appliances and storage.
2. Lay a Solid Foundation:
The island's foundation is paramount to its stability and durability. Choose a durable material such as concrete or pavers. For a concrete base, excavate the area to the desired depth, create a formwork, and pour the concrete. For pavers, prepare a leveled base of sand or gravel and lay the pavers in a stable pattern.
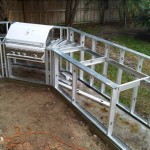
3. Build the Framework:
Utilize sturdy materials like pressure-treated lumber or steel for the island's framework. Construct the base by securing the vertical posts to the foundation and interconnecting them with horizontal beams. Ensure the framework is level and square to prevent any structural issues.
4. Design the Countertop:
The countertop is the centerpiece of the island. Select a material that withstands outdoor elements, such as granite, quartz, or concrete. Cut the countertop to the desired shape and size, and secure it to the framework with appropriate fasteners.
5. Incorporate Appliances:
Equip your island with essential appliances to enhance its culinary capabilities. Consider a built-in grill, a sink with running water, and a mini-fridge for convenience. Plan electrical and plumbing rough-ins to accommodate these appliances.
6. Add Storage Space:
Keep your grilling and cooking essentials organized with ample storage space. Incorporate drawers, cabinets, or shelves into the island's design. Choose weather-resistant materials to safeguard contents from the elements.
7. Accessorize and Embellish:
Transform your island into an aesthetic masterpiece by adding decorative touches. Install lighting fixtures to illuminate the cooking area, and consider adding a backsplash to protect the walls from splatters. Adorn the island with potted plants, outdoor cushions, or artwork to create a vibrant and inviting ambiance.
8. Finishing Touches:
Apply a protective sealant or paint to the island's surfaces to enhance its longevity and resistance to wear and tear. Ensure regular maintenance and cleaning to keep your outdoor kitchen island looking its best and functioning optimally.
Remember, the journey of building your outdoor kitchen island is as unique as your vision. Embrace your creativity and tailor the design to reflect your personal style and culinary aspirations. By following these steps, you can create an enchanting island that will become the heart of your outdoor gatherings.
How To Build An Outdoor Kitchen Island Done In A Weekend Game Day Tips Grill Like Champion

Creating Your Perfect Outdoor Kitchen Ibdodr Com

Outdoor Kitchen Layouts Plans For Function Style

36 Ideas For Building The Ultimate Outdoor Kitchen Extra Space Storage

Outdoor Kitchen Island Build Plans Houseful Of Handmade

36 Ideas For Building The Ultimate Outdoor Kitchen Extra Space Storage

Inexpensive Diy Outdoor Kitchen Ideas

Inexpensive Diy Outdoor Kitchen Ideas

8 Outdoor Kitchen Island Ideas The Family Handyman
:strip_icc()/102539887-10a7a4f3908244b9b2cf5bb168180d43.jpg?strip=all "How To Build A Diy Brick Outdoor Kitchen")
How To Build A Diy Brick Outdoor Kitchen
Related Posts