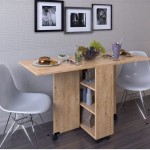
Make Your Own Kitchen Island With Cabinets
Building a custom kitchen island with cabinets offers homeowners the opportunity to tailor their kitchen space to their specific needs and aesthetic preferences. This project can be accomplished with various skill levels, from novice DIYers to experienced woodworkers. Careful planning and execution are essential for a successful outcome.
Planning Your Kitchen Island
The initial planning phase is crucial for determining the island's functionality and design. Key considerations include:
- Purpose: Will the island be primarily for food preparation, dining, storage, or a combination of these?
- Size and Placement: Measure the available kitchen space to ensure adequate clearance for walkways and appliance operation. The island's dimensions should complement the existing kitchen layout.
- Cabinet Selection: Choose cabinets that match the existing kitchen style or create a desired contrast. Consider pre-fabricated cabinets for ease of assembly or opt for building custom cabinets for greater design flexibility.
- Countertop Material: Select a durable and aesthetically pleasing countertop material that suits the island's intended use. Options include granite, quartz, butcher block, and concrete.
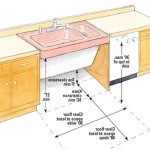
- Electrical and Plumbing: Determine if the island will require electrical outlets for appliances or plumbing for a sink or dishwasher. Consult with qualified professionals for these installations.
Gathering Materials and Tools
Once the planning phase is complete, gather all necessary materials and tools. This organized approach ensures a smooth construction process.
- Cabinets: Procure the chosen cabinets, ensuring they are the correct dimensions and style.
- Lumber: Acquire lumber for the island's base frame, ensuring it is appropriately sized for the weight it will bear.
- Countertop: Order the selected countertop material, allowing sufficient time for fabrication and delivery.
- Hardware: Gather necessary hardware, including screws, nails, cabinet pulls, and hinges.
- Tools: Assemble necessary tools, including a circular saw, drill, level, measuring tape, and safety equipment.
- Plumbing and Electrical Supplies (if applicable): If incorporating plumbing or electrical elements, procure the necessary supplies and ensure compliance with local building codes.
Building the Island Base
Constructing a sturdy base is fundamental to the island's stability. The base frame should be level and square.
- Frame Construction: Build a rectangular frame from lumber, ensuring it is the correct size to support the cabinets and countertop. Use appropriate joinery techniques for a strong and stable frame.
- Adding Support: Reinforce the frame with cross bracing to prevent sagging and ensure long-term stability. Consider adding additional vertical supports if the island will be particularly heavy.
- Leveling: Use shims to level the frame on the floor, ensuring a stable and even surface for the cabinets.
Installing the Cabinets
Proper cabinet installation is essential for a seamless and professional appearance.
- Placement: Position the cabinets on the base frame, ensuring they are evenly spaced and aligned.
- Securing Cabinets: Secure the cabinets to the base frame and to each other using screws. Use clamps to hold the cabinets in place during the fastening process.
- Shimming and Leveling: Shim and level the cabinets as needed to ensure a perfectly flat surface for the countertop.
Installing the Countertop
The countertop installation is a critical step in completing the island.
- Placement: Carefully position the countertop on the cabinets, ensuring proper overhang and alignment.
- Securing: Secure the countertop to the cabinets using appropriate fasteners, following the manufacturer's instructions.
- Sealing: Seal the countertop as needed, depending on the material chosen, to protect it from stains and moisture.
Finishing Touches
The final details complete the island's functionality and aesthetic appeal.
- Installing Hardware: Install cabinet pulls, knobs, and other hardware.
- Adding Trim: Apply trim molding around the base of the island to conceal any gaps and enhance the overall appearance. Consider adding decorative molding to the cabinet faces for a more elaborate design.
- Painting or Staining: Paint or stain the island to match the existing kitchen décor or create a desired contrast. Apply a protective topcoat for durability.
- Connecting Plumbing and Electrical (if applicable): If the island includes plumbing or electrical elements, connect these services, ensuring compliance with local codes and regulations. Consult with qualified professionals for these connections.
Safety Considerations
Prioritizing safety throughout the project is paramount. Adhering to safety guidelines prevents accidents and ensures a successful outcome.
- Eye Protection: Wear safety glasses throughout the project to protect eyes from dust and debris.
- Hearing Protection: Use hearing protection when operating power tools.
- Proper Ventilation: Ensure adequate ventilation when working with paints, stains, and other chemicals.
- Electrical Safety: Disconnect power before working on any electrical components. Consult with a qualified electrician for any electrical work.

Building My Kitchen Island 30

How To Build A Kitchen Island From Cabinet Thistlewood Farms

How To Build A Diy Kitchen Island House By The Bay Design
:strip_icc()/103058781-a03e8c2363914f6c94d5d14eb13e5b34.jpg?strip=all "How To Make A Kitchen Island")
How To Make A Kitchen Island

15 Diy Kitchen Islands Unique Island Ideas And Decor

Do It Yourself Kitchen Islands From Stock Cabinets

Build A Diy Kitchen Island Basic

Diy Kitchen Island Makeover Made With Big Box Cabinets Artsy Rule

Easy Diy Kitchen Island Tutorial Step By Guide

A Diy Kitchen Island Step By Guide
Related Posts