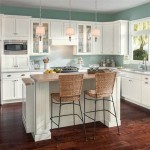
Essential Aspects of DIY Kitchen Island with Seating for a 4-Year-Old Baby Girl
Creating a DIY kitchen island with seating for a 4-year-old baby girl is a rewarding project that can provide a functional and adorable spot for your little one to play and dine. Here are some essential aspects to consider when designing and building your own island:
1. Size and Dimensions
Determine the desired size of your island based on the space available in your kitchen. Measure the child's height to ensure that the seat is at an appropriate height, roughly around 18-24 inches from the floor. The island should be large enough for the child to move around comfortably while still being able to reach the counter and footrest.
2. Materials
Choose durable materials that are easy to clean and safe for your child. Consider using solid wood, plywood, or laminate for the frame and countertop. Opt for non-toxic paints and finishes that meet child safety standards.
3. Storage Options
Incorporate storage drawers or shelves into the island to keep toys, snacks, or art supplies within your child's reach. Choose drawers with easy-to-grip handles and slow-closing mechanisms for safety.
4. Safety Features
Prioritize safety by adding rounded corners and edges to prevent injuries. Install a footrest at the base of the seat to provide support and comfort. Consider using non-slip mats under the island to prevent movement.
5. Decorative Elements
Personalize the island with decorative touches that appeal to your child's interests. Paint it in bright colors, add whimsical details like animal cutouts, or use knobs in fun shapes. Encourage your child to participate in the design process to make it feel like their own special space.
6. Lighting
Provide adequate lighting above or below the island to create a well-lit area for playing and eating. Use LED bulbs or natural light to ensure good visibility.
7. Stability
Ensure the island is stable and secure by attaching it to the floor or nearby cabinetry. Use sturdy joinery techniques and reinforce the frame as needed. Test the stability by leaning against it or applying some weight to make sure it won't tip over.
8. Cleanability
Opt for materials and finishes that are easy to wipe down and clean. Choose a countertop that can withstand spills and food stains. Regularly clean the island to maintain its hygiene and prevent any accidents.
9. Fun and Functionality
Strike a balance between fun and functionality. Create a space that encourages your child's creativity and play while providing a practical seating area for them to enjoy meals or snacks.
10. Child Growth
Consider the child's growth when designing the island. Choose a seat height that can be adjusted or easily modified as the child grows taller. This will ensure the island continues to be a comfortable and functional spot for many years to come.

Creating An Kitchen Island Pink Little Notebookpink Notebook

Diy Kitchen Island From A Yard Cupboard Little Vintage Cottage

How To Make A Play Kitchen From 10 Piece Of Furniture At Home With Ashley

My Diy Play Kitchen

How To Make A Play Kitchen From 10 Piece Of Furniture At Home With Ashley
.jpg?strip=all "Diy Kitchen Island From A Yard Cupboard Little Vintage Cottage")
Diy Kitchen Island From A Yard Cupboard Little Vintage Cottage

Diy Kitchen Island From A Yard Cupboard Little Vintage Cottage

How To Make A Homemade Play Kitchen From Cabinet Young House Love

Diy Upcycled Dresser Kitchen Island Part 1 Scavenger Chic

Kitchen Island Carts Pictures Ideas From
Related Posts