DIY Kitchen Island with Seating for a 4-Year Old: A Baby Girl Shower Essential
Planning a baby girl shower can be an exciting and memorable experience. One way to make it extra special is to create a unique and functional space where guests can gather and enjoy themselves. A DIY kitchen island with seating for a 4-year old can serve as the perfect centerpiece for this occasion.
Materials Required:
- Plywood (3/4 inch thickness)
- Pine lumber (2x4s and 2x6s)
- Screws
- Nails
- Wood glue
- Paint or stain
- Handles
- Fabric for cushion covers
Step-by-Step Instructions:
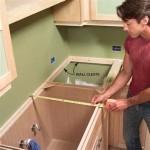
1. Build the Base: Cut the plywood into the desired shape and size of the island. Attach the 2x4s to the edges of the plywood as a frame using screws and wood glue. For added stability, reinforce the frame with additional 2x4s in the center.
2. Create the Countertop: Cut another piece of plywood to the same size as the base. Place it on top of the frame and secure it with screws or nails. For a more sturdy countertop, consider using a thicker plywood or adding a layer of laminate.
3. Add Storage: If desired, you can incorporate storage into the island by cutting out sections of the plywood base and framing them with 2x6s. The resulting compartments can be used to store toys, dishes, or other supplies.
4. Build the Seating: Cut two pieces of 2x6 lumber to the height of the desired seats. Attach them to the front of the island using screws and wood glue, ensuring they are slightly angled for comfort.
5. Create the Cushion Covers: Measure the size of the seats and cut fabric accordingly. Sew the fabric pieces together, leaving an opening for stuffing. Fill the covers with foam or batting, then stitch the opening closed.
6. Finish the Island: Sand the entire island to smooth any rough edges. Paint or stain it in a color that matches the baby shower theme. Attach handles to the compartments for easy access.
Decorating Ideas:
1. Garland and Bunting: Add a touch of whimsy by stringing up garland or bunting in soft pink, white, or floral patterns.
2. Floral Arrangements: Place fresh floral arrangements on the island or in small vases around it. Choose flowers that complement the baby shower theme.
3. Decorative Pillows: Add some extra comfort and cuteness to the seating by placing decorative pillows in baby-friendly colors and patterns.
4. Tableware: Set the table with adorable tableware featuring baby animal designs or floral motifs.
Conclusion:
A DIY kitchen island with seating for a 4-year old can elevate your baby girl shower celebration and provide a charming and practical space for guests. By following these instructions and incorporating creative decorating ideas, you can create a centerpiece that will leave a lasting impression.

Organize The Kitchen Island Build A Shelf Sew Woodsy

The Ultimate Diy Craft Island And Cutting Table

Organize The Kitchen Island Build A Shelf Sew Woodsy

Organize The Kitchen Island Build A Shelf Sew Woodsy

Organize The Kitchen Island Build A Shelf Sew Woodsy

Baby Gates But Make Them Cute Our Little One Is On The Move So It Was Time To Gate Off These Stairs My Old Bench Solution Wasn T Cutting I Set Out Build 2 Simple Yet Stylish

6 Creative New Kitchen Island Features To Consider

Diy Baby Shower Diaper Cakes Junk Chic Cottage

Diy Kitchen Trash Cabinet Makeover On A Budget

Organize The Kitchen Island Build A Shelf Sew Woodsy
Related Posts