How To Build a Kitchen Island Bench
A kitchen island bench stands as a versatile and valuable addition to many homes. It functions as a central hub for food preparation, casual dining, and social gatherings. Beyond its functional aspects, a well-designed kitchen island bench can significantly augment a kitchen's aesthetic appeal and overall value. The construction of a kitchen island bench is a manageable project for a moderately skilled DIY enthusiast, requiring careful planning, a selection of appropriate materials, and adherence to sound construction techniques. The following guide provides a comprehensive overview of the process involved in building a sturdy and attractive kitchen island bench.
Planning and Design Considerations
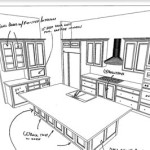
Before initiating the construction process, thorough planning and design considerations are paramount. The island's dimensions, configuration, and integrated features must align with the kitchen's existing layout, available space, and the homeowner’s specific needs and preferences. Neglecting this stage can lead to functional limitations and aesthetic inconsistencies. Consider the following elements during the planning phase:
1. Size and Spacing: The dimensions of the island bench must be proportionate to the kitchen's overall size. A commonly accepted rule of thumb is to maintain a minimum of 36 inches of clearance between the island and surrounding cabinetry or walls. This clearance allows for comfortable movement and unimpeded access to appliances and storage spaces. Larger kitchens can accommodate larger islands, while smaller kitchens may necessitate a more compact design. Accurately measure the available space and sketch out the proposed island's footprint to ensure adequate clearance.
2. Functionality: Define the primary purpose of the island bench. Will it primarily serve as a food preparation area, a dining space, or a combination of both? The intended function will dictate the required features and configuration. If food preparation is the primary function, consider incorporating a sink, a garbage disposal unit, or ample countertop space for chopping and mixing. If it's intended as a dining space, plan for an overhang to accommodate seating and ensure adequate legroom.
3. Style and Aesthetics: The island bench should complement the existing kitchen design and reflect the homeowner's personal style. Consider the color scheme, materials, and architectural details of the kitchen when selecting the island's finishes and features. A classic kitchen might benefit from a traditional island design with raised panel doors and a painted finish, while a modern kitchen might be better suited to a sleek, minimalist island with stainless steel accents and a solid surface countertop.
4. Plumbing and Electrical: If the island bench will incorporate a sink, dishwasher, or electrical outlets, careful planning of the plumbing and electrical infrastructure is essential. Consult with qualified plumbers and electricians to ensure that the necessary connections are properly installed and comply with local building codes. Plan the location of pipes and wires to minimize their visibility and ensure easy access for maintenance and repairs.
5. Storage Solutions: Maximize the island’s functionality by thoughtfully incorporating storage solutions. Consider including drawers, cabinets, shelves, or pull-out organizers to store cookware, utensils, and other kitchen essentials. Optimize the storage design to accommodate the intended use of the island. For example, if the island is intended for baking, incorporate storage for baking sheets, mixing bowls, and other baking supplies.
Materials and Tool Selection
The selection of appropriate materials is crucial to ensure the durability, stability, and aesthetic appeal of the kitchen island bench. Choose high-quality materials that are suitable for the intended use and that complement the overall kitchen design. Acquire the necessary tools and equipment to facilitate the construction process. The following list provides a guide to the essential materials and tools:
1. Framing Materials: Kiln-dried lumber, such as pine or poplar, is commonly used for the island's frame. These woods are relatively inexpensive, readily available, and easy to work with. Ensure that the lumber is straight, free of knots and defects, and properly treated to prevent warping or rot. Consider using pressure-treated lumber for areas that may be exposed to moisture, such as the base of the island.
2. Cabinetry Materials: Plywood or medium-density fiberboard (MDF) is often used for the island's cabinetry. Plywood is a strong and durable material that is resistant to moisture, while MDF is a smooth and stable material that is ideal for painting. Choose the material that best suits the desired aesthetic and functional requirements. Solid wood can also be used, but it is generally more expensive.
3. Countertop Material: A wide variety of countertop materials are available, each with its own advantages and disadvantages. Common choices include granite, quartz, marble, butcher block, and laminate. Granite and quartz are durable, heat-resistant, and aesthetically pleasing, but they can be expensive. Butcher block provides a warm and natural look, but it requires regular maintenance. Laminate is an affordable and versatile option, but it is less durable than other materials.
4. Hardware: Select high-quality hardware, such as hinges, drawer slides, and knobs or pulls, to ensure the smooth and reliable operation of the island's doors and drawers. Choose hardware that complements the overall style of the kitchen and that is durable enough to withstand everyday use.
5. Fasteners: Use appropriate fasteners, such as screws, nails, and wood glue, to securely assemble the island's components. Choose fasteners that are compatible with the materials being used and that are strong enough to withstand the stresses of everyday use.
6. Essential Tools: The following tools are essential for building a kitchen island bench: a saw (circular saw, jigsaw, or miter saw), a drill/driver, a level, a measuring tape, a square, a sander, a router (optional), clamps, safety glasses, and dust mask.
Construction Process
The construction process involves assembling the island's frame, building the cabinetry, installing the countertop, and adding finishing touches. Adhere to the following steps to ensure a successful outcome:
1. Building the Frame: Construct the island's frame using the pre-cut lumber. The frame provides the structural support for the island. Start by assembling the base frame, which will sit on the floor. Ensure that the frame is level and square. Add vertical supports to the frame to provide additional stability and to support the countertop. Securely fasten all frame members using screws and wood glue.
2. Building the Cabinetry: Construct the cabinetry using the pre-cut plywood or MDF. The cabinetry provides storage space and enhances the island's aesthetic appeal. Start by building the cabinet boxes. Ensure that the boxes are square and plumb. Install the doors and drawers using hinges and drawer slides. Add shelves or pull-out organizers to maximize storage functionality. Securely fasten all cabinetry components using screws and wood glue.
3. Installing the Countertop: Install the countertop onto the frame. Secure the countertop to the frame using construction adhesive and screws. Ensure that the countertop is level and flush with the surrounding surfaces. If the countertop is made of stone, such as granite or quartz, consult with a professional installer for assistance. Stone countertops are heavy and require specialized handling and installation techniques.
4. Adding Finishing Touches: Add the finishing touches to the island bench. This may include installing trim, painting or staining the cabinetry, and adding hardware. Install trim to conceal any exposed edges or seams. Paint or stain the cabinetry to complement the overall kitchen design. Install hardware, such as knobs or pulls, to the doors and drawers. Consider adding decorative elements, such as corbels or legs, to enhance the island's aesthetic appeal.
5. Plumbing and Electrical Connections: If the island bench incorporates a sink, dishwasher, or electrical outlets, connect the plumbing and electrical lines. Ensure that all connections are properly installed and comply with local building codes. Consult with qualified plumbers and electricians to ensure that the work is performed safely and correctly.
6. Sealing and Protection: Protect the island bench from moisture and damage by applying a sealant or finish. Apply a sealant to the countertop to prevent staining and water damage. Apply a finish to the cabinetry to protect it from scratches and wear. Use a high-quality sealant and finish that is appropriate for the materials being used.
Building a kitchen island bench requires careful planning, attention to detail, and adherence to sound construction practices. By following these guidelines, one can create a functional and aesthetically pleasing addition to their kitchen that will enhance both its value and its enjoyment.

Building My Kitchen Island 30

Easy Diy Kitchen Island Tutorial Step By Guide

How To Build A Kitchen Island Bench

7 Creative Design Ideas For Kitchen Island Bench Seating

7 Creative Design Ideas For Kitchen Island Bench Seating

Build Out A Kitchen Island With Side Panels Thrifty Decor Diy And Organizing

Diy Modern Wood Slat Kitchen Island Peninsula

40 Diy Kitchen Island Ideas That Can Transform Your Home

Building My Kitchen Island 30

Kitchen Island Bench Woodworking Plans
Related Posts


