How To Update Kitchen Cabinets Without Painting
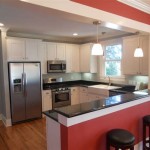
Kitchen cabinets are a significant visual element in any home, and their aesthetic condition can greatly impact the overall feel of the space. While painting is a common method for revitalization, it can be time-consuming, require extensive preparation, and involve the potential for mess and fumes. Fortunately, there are numerous ways to update kitchen cabinets without resorting to paint, offering alternative paths to achieving a fresh and modern look.
These methods range from simple hardware replacements to more involved modifications. This article will explore several strategies for updating kitchen cabinets without painting, offering detailed explanations and practical advice for each approach. The key lies in identifying the desired aesthetic outcome and selecting the techniques that best align with the existing cabinet style and budget.
Replacing Hardware for an Instant Upgrade
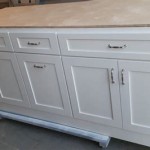
One of the simplest and most impactful ways to update kitchen cabinets without painting is by replacing the existing hardware. Handles, knobs, and pulls can dramatically alter the aesthetic, allowing for a quick and cost-effective transformation. This method is particularly effective when the cabinet boxes and doors are in relatively good condition but the hardware appears outdated or worn.
The selection process for new hardware should consider several factors. First, the style of the hardware should complement the overall kitchen design. Modern kitchens might benefit from sleek, minimalist pulls made from stainless steel or brushed nickel. Traditional kitchens could be enhanced with ornate knobs or handles crafted from bronze or antique brass. The finish of the hardware is also crucial; matching the finish to other elements in the kitchen, such as the faucet or light fixtures, can create a cohesive look.
Before purchasing new hardware, it's important to measure the existing hole spacing. This will ensure that the new hardware fits properly and eliminates the need for drilling new holes, which can be a more complex undertaking. Most hardware manufacturers provide detailed specifications, including hole spacing, in their product descriptions. It is also advisable to purchase a few extra pieces of hardware to account for any potential damage or loss during installation. The installation itself typically involves using a screwdriver to remove the old hardware and then attaching the new hardware using the provided screws. For cabinets with existing knobs, upgrading to pulls might require filling the existing hole and drilling two new ones at the appropriate spacing.
Beyond the standard handles and knobs, consider other hardware options that can add functionality and style. Soft-close hinges can be installed to prevent slamming and prolong the life of the cabinets. Drawer slides can be upgraded to provide smoother operation and increased weight capacity. These additions, while not directly altering the exterior appearance, can significantly enhance the user experience and contribute to the overall feeling of a modern and well-maintained kitchen.
Adding Decorative Trim and Molding
Introducing decorative trim and molding is another effective method for updating kitchen cabinets without painting. This approach involves applying various types of molding to the existing cabinet structure to create a more refined and custom appearance. The addition of trim can add dimension, depth, and visual interest, transforming plain cabinets into focal points within the kitchen.
Crown molding is a popular choice for adding a touch of elegance to the upper cabinets. It is typically installed at the top of the cabinets, where they meet the ceiling, to create a seamless transition. Light rail molding, installed beneath the upper cabinets, can conceal under-cabinet lighting and provide a finished look. Base molding, applied to the bottom of the lower cabinets, can create a more substantial and grounded appearance.
In addition to these standard types of molding, there are numerous other options available, including panel molding, rope molding, and appliqués. Panel molding can be used to create a raised panel effect on flat cabinet doors, adding a touch of traditional style. Rope molding, with its intricate twisted design, can add a decorative accent to edges and corners. Appliqués, which are decorative carvings or ornaments, can be applied to cabinet doors or panels to create a unique and personalized look.
The installation of trim and molding typically involves cutting the pieces to the desired length and angle, then attaching them to the cabinets using construction adhesive and finishing nails. Accurate measurements and precise cuts are essential for achieving a professional result. A miter saw is highly recommended for making angled cuts. Before attaching the trim, it is important to clean and prepare the surface of the cabinets to ensure proper adhesion. Filling nail holes and sanding the trim smooth will create a seamless finish.
While painting the trim and molding to match the existing cabinets is an option, consider staining the trim to create a contrasting effect. A darker stain can add warmth and richness to the kitchen, while a lighter stain can create a more airy and modern feel. The key is to choose a stain that complements the existing cabinet color and the overall kitchen design.
Refacing Cabinet Doors and Drawer Fronts
Refacing kitchen cabinets involves replacing the existing doors and drawer fronts while leaving the cabinet boxes in place. This is a more extensive project than simply replacing the hardware or adding trim, but it is still a less disruptive and less expensive alternative to a complete kitchen remodel. Refacing can significantly alter the appearance of the cabinets, allowing for a change in style, color, and material.
The first step in refacing is to measure the existing cabinet doors and drawer fronts accurately. This information will be used to order the new doors and drawer fronts. It is important to specify the hinge type and location to ensure that the new doors will fit properly. Consider the style of the new doors and drawer fronts. Options include shaker-style doors, raised panel doors, flat panel doors, and slab doors. The choice will depend on the desired aesthetic and the overall kitchen design.
The new doors and drawer fronts can be made from a variety of materials, including wood, laminate, and thermofoil. Wood doors offer a classic and timeless look, but they require regular maintenance. Laminate doors are more durable and easier to clean, but they may not have the same warmth and character as wood. Thermofoil doors are a cost-effective option that is resistant to moisture and stains. Regardless of the material chosen, it is important to select a finish that complements the existing cabinet boxes and the overall kitchen design.
The installation process involves removing the old doors and drawer fronts, attaching the new doors with hinges, and attaching the new drawer fronts to the drawer boxes. Ensure the new hinges are compatible with the existing cabinet boxes. If the existing hinge locations are not compatible, new holes may need to be drilled. It is also important to adjust the hinges to ensure that the doors close properly and align evenly. Install new hardware, such as handles and knobs, to complete the refacing project.
Consider adding decorative panels to the exposed sides of the cabinet boxes to create a more finished look. These panels can be matched to the new doors and drawer fronts to create a seamless appearance. Refacing is a substantial project, but it can significantly update the kitchen without the mess and expense of painting or a full remodel. By carefully planning the project and selecting the right materials, it's possible to achieve a dramatic transformation.
Applying Decorative Contact Paper or Vinyl
Applying decorative contact paper or vinyl is a budget-friendly and temporary solution for updating kitchen cabinets without painting. This involves covering the existing cabinet surfaces with self-adhesive materials that come in a variety of colors, patterns, and textures. While not as durable or long-lasting as other methods, contact paper and vinyl can provide an instant refresh and allow for experimentation with different styles.
The preparation process is crucial for achieving a smooth and professional-looking result. First, clean the cabinet surfaces thoroughly with a degreasing cleaner to remove any dirt, grime, or grease. Any imperfections or unevenness on the surface will be visible through the contact paper or vinyl, so it is important to sand down any rough spots or fill any holes with wood filler. Once the surface is clean and smooth, measure the area to be covered and cut the contact paper or vinyl to the appropriate size, leaving a slight overlap on each edge.
When applying the contact paper or vinyl, start at one edge and slowly peel away the backing, smoothing the material onto the surface as you go. Use a smoothing tool, such as a plastic scraper or a credit card, to press out any air bubbles and ensure that the material adheres evenly. Work slowly and carefully to avoid wrinkles or creases. If air bubbles do appear, carefully prick them with a needle and smooth the material again. Trim any excess material around the edges with a sharp utility knife.
Contact paper and vinyl come in a wide range of designs, including solid colors, wood grain patterns, marble patterns, and geometric patterns. Choose a design that complements the overall kitchen style and the existing cabinet hardware. For a more cohesive look, consider using the same contact paper or vinyl on all of the cabinet doors and drawer fronts. Alternatively, use different designs to create a more eclectic or personalized look.
While contact paper and vinyl are relatively easy to apply, they are not as durable as other materials. They are susceptible to scratches, tears, and peeling, so it is important to handle them with care. Avoid using harsh cleaning chemicals or abrasive scrubbers, as these can damage the surface. With proper care, contact paper and vinyl can provide a temporary and affordable way to update kitchen cabinets without painting. This is a suitable option if you’re renting or want to test out a new colour or style before committing to a more permanent solution.
Under-Cabinet Lighting Installation
Installing under-cabinet lighting is an excellent method to enhance the aesthetics and functionality of a kitchen without painting the cabinets themselves. This involves adding light fixtures beneath the upper cabinets to illuminate the countertop, creating a brighter and more inviting workspace. Under-cabinet lighting can also highlight the backsplash and other decorative elements, adding visual interest to the kitchen.
There are several types of under-cabinet lighting available, including LED strip lights, puck lights, and linear lights. LED strip lights are energy-efficient and versatile, allowing for customizable lengths and colors. Puck lights are small and discreet, providing focused illumination for specific areas. Linear lights offer a more uniform and diffused light, ideal for illuminating the entire countertop.
The installation process will vary depending on the type of lighting chosen. LED strip lights typically come with an adhesive backing, making them easy to install along the underside of the cabinets. Puck lights may require drilling small holes for mounting. Linear lights may require mounting brackets or clips. Ensure the lights are positioned to provide adequate illumination without creating glare or shadows.
Before starting the installation, determine the power source and wiring configuration. Some under-cabinet lights are plug-in models, while others require hardwiring to an electrical circuit. Hardwiring should be performed by a qualified electrician. If using plug-in lights, ensure there is a nearby outlet and consider using a cable management system to conceal the cords. Proper wiring and cable management are crucial for safety and a clean aesthetic.
Under-cabinet lighting can be controlled with a variety of switches, including dimmer switches, motion sensors, and remote controls. Dimmer switches allow for adjusting the brightness of the lights, creating different moods and ambiance. Motion sensors automatically turn the lights on when someone enters the kitchen, providing convenience and energy savings. Remote controls allow for controlling the lights from anywhere in the room. The selection of a suitable switch can significantly enhance the usability and functionality of the under-cabinet lighting.

Updating A 90s Kitchen Without Painting Cabinets

Updating Wood Kitchen Cabinets Love Remodeled

How To Make Oak Kitchen Cabinets Look Modern Without Painting The Diy Nuts

Great Ideas To Update Oak Kitchen Cabinets

How To Update Your Kitchen Without Painting Cabinets Meredith Lynn Designs

Updating A 90s Kitchen Without Painting Cabinets

Updating A Kitchen With Oak Cabinets Without Painting Them Modern Wall Color

How To Update Wood Cabinets No Painting Simply Diy Home

Updating A Kitchen With Oak Cabinets Without Painting Them

How To Update Oak Cabinets With Briwax Stained Kitchen Honey Updating
Related Posts