Kitchen Cabinet Redo Tips To Refresh Your Spaceship
The kitchen is often considered the heart of a home, and within that space, kitchen cabinets play a crucial role in both functionality and aesthetics. Over time, cabinets can become worn, outdated, or simply no longer suit the homeowner’s evolving tastes. Rather than undertaking a full kitchen remodel, which can be expensive and time-consuming, a kitchen cabinet redo offers a practical and cost-effective solution to refresh the space. This process involves updating the existing cabinets through various methods, breathing new life into the kitchen without the need for complete replacement. This article will explore various techniques and considerations for executing a successful kitchen cabinet redo.
Before embarking on a cabinet redo, careful assessment of the existing cabinets is essential. This evaluation will determine the scope of the project and the most appropriate methods to employ. Factors to consider include the age and condition of the cabinets, the type of material they are made of (wood, laminate, metal, etc.), and the overall style of the kitchen. Are the cabinets structurally sound, or are there issues such as warping, rot, or significant damage? Are the hinges and hardware functioning properly? Are the cabinet boxes in good shape? The answers to these questions will guide the decision-making process and help determine whether simple cosmetic changes, such as painting or refinishing, are sufficient, or if more extensive repairs or replacements are necessary.
Budgeting is another critical aspect of planning a kitchen cabinet redo. The cost can vary widely depending on the chosen methods, the size of the kitchen, and whether the work is done DIY or by professionals. Researching material costs, labor rates (if applicable), and potential unexpected expenses is crucial to developing a realistic budget. It is advisable to obtain multiple quotes from contractors if professional assistance is sought, and to factor in a contingency fund for unforeseen issues that may arise during the project.
Preparing Your Cabinets for a Redo
Preparation is key to achieving a successful and long-lasting kitchen cabinet redo. This stage involves several important steps, regardless of the chosen method, to ensure proper adhesion and a professional finish.
The first step is to thoroughly clean the cabinets. Years of accumulated grease, dirt, and grime can prevent paint or other finishes from adhering properly. Use a strong degreasing cleaner and scrub all surfaces, including doors, drawers, and cabinet boxes. Rinse thoroughly with clean water and allow the cabinets to dry completely before proceeding.
Next, remove all hardware, such as knobs, pulls, hinges, and latches. This will prevent them from being accidentally painted or otherwise damaged during the redo process. Store the hardware in a safe place, and consider labeling each piece to ensure easy reassembly later. If the hardware is outdated or damaged, this is an opportunity to replace it with new, more modern options.
Sanding is often a necessary step, especially for cabinets with a glossy or smooth finish. Sanding creates a textured surface that allows paint or other finishes to grip better. Use a medium-grit sandpaper to lightly sand all surfaces, taking care not to remove too much material. For cabinets with intricate details, consider using a sanding sponge or detail sander to reach tight spaces. After sanding, wipe down the cabinets with a tack cloth to remove any sanding dust.
For cabinets with significant damage, such as deep scratches or gouges, wood filler can be used to repair the imperfections. Apply the filler according to the manufacturer’s instructions, allow it to dry completely, and then sand it smooth to blend with the surrounding surface. Priming is often recommended, particularly for cabinets that have been sanded or repaired. Primer helps to create a uniform surface and improves the adhesion of the top coat. Apply a thin, even coat of primer using a brush, roller, or sprayer, and allow it to dry completely before proceeding.
Painting or Refinishing Kitchen Cabinets
Painting and refinishing are two of the most common methods for updating kitchen cabinets. Painting involves applying a new coat of paint to completely change the color and appearance of the cabinets. Refinishing, on the other hand, involves removing the existing finish and applying a new stain or clear coat to enhance the natural wood grain.
When choosing paint for kitchen cabinets, select a high-quality paint specifically designed for cabinets or furniture. Acrylic latex paint is a popular choice due to its durability, ease of cleaning, and low odor. For a more professional finish, consider using a paint sprayer, which can provide a smooth, even coat. Alternatively, a brush and roller can be used, but it may require more effort to achieve a flawless finish. Apply multiple thin coats of paint, allowing each coat to dry completely before applying the next. Lightly sand between coats to remove any imperfections and ensure proper adhesion.
Refinishing is a more complex process than painting, as it involves stripping the existing finish from the cabinets. This can be done using a chemical stripper, a heat gun, or sanding. The choice of method depends on the type of finish and the condition of the cabinets. Once the old finish has been removed, sand the cabinets smooth and apply a stain or clear coat to enhance the natural wood grain. Follow the manufacturer’s instructions for the chosen finish, and apply multiple thin coats for best results. Like painting, lightly sand between coats to remove any imperfections.
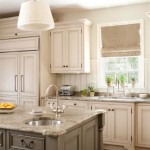
Considerations for color selection are crucial to the overall aesthetic. Neutral colors, such as white, gray, or beige, are popular choices for kitchen cabinets as they create a clean and timeless look. However, bolder colors can also be used to add personality and visual interest to the kitchen. When choosing a color, consider the existing décor, the amount of natural light in the room, and the overall style of the home. Testing paint samples on a small, inconspicuous area of the cabinet before committing to the entire project is highly recommended to ensure satisfaction with the chosen color.
Replacing Doors, Drawer Fronts, and Hardware
Another effective method for refreshing kitchen cabinets is to replace the doors and drawer fronts. This option allows for a significant change in style without the expense of replacing the entire cabinet boxes. Numerous companies specialize in manufacturing replacement doors and drawer fronts in a variety of styles, materials, and finishes. Choosing options that complement the existing kitchen décor and personal preferences is important.
When selecting replacement doors and drawer fronts, consider the style of the kitchen. Shaker-style doors, with their simple, clean lines, are a popular choice for modern and transitional kitchens. Raised-panel doors, with their more ornate detailing, are often used in traditional kitchens. Slab doors, with their flat, minimalist design, are a good choice for contemporary kitchens. Material options include wood, MDF (medium-density fiberboard), and laminate. Wood is a classic choice, offering natural beauty and durability. MDF is a more affordable option that can be painted or stained to mimic the look of wood. Laminate is a durable and easy-to-clean option that is available in a wide range of colors and patterns.
Updating the hardware can also have a significant impact on the overall look of the kitchen cabinets. Replacing old or outdated knobs, pulls, and hinges with new, more modern options can instantly transform the appearance of the cabinets. Hardware is available in a variety of styles, materials, and finishes, allowing homeowners to customize the look of their kitchen to their liking. Brushed nickel, stainless steel, and oil-rubbed bronze are popular choices for modern kitchens, while antique brass and copper are often used in traditional kitchens. Be sure to measure the existing hardware before purchasing replacements to ensure that the new hardware will fit properly.
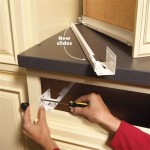
The installation process for new doors and drawer fronts is relatively straightforward. Remove the old doors and drawer fronts, and then attach the new ones using the existing hinges or by installing new hinges. Be sure to align the doors and drawer fronts properly to ensure that they open and close smoothly. Install the new hardware, such as knobs and pulls, and make any necessary adjustments. Replacing cabinet hardware is a simple and cost-effective way to update the look of kitchen cabinets.
Beyond these core techniques, other options can further enhance a kitchen cabinet redo. Adding decorative trim, such as crown molding or baseboards, can add architectural interest to the cabinets. Installing under-cabinet lighting can improve visibility and create a warm and inviting ambiance. Adding pull-out shelves or organizers inside the cabinets can improve functionality and maximize storage space. These additional enhancements can elevate the overall look and functionality of the kitchen, creating a space that is both beautiful and practical.

How To Reface Kitchen Cabinets Affordable Cabinet Update On A Budget Anika S Diy Life

21 Diy Affordable Ways To Redo Kitchen Cabinets Extra Space Storage

How To Update Your Kitchen Cabinets Without Replacing Them Real Estate U S News

How To Reface Kitchen Cabinets Affordable Cabinet Update On A Budget Anika S Diy Life

21 Diy Affordable Ways To Redo Kitchen Cabinets Extra Space Storage

Transform Your Kitchen With This One Update Before After Kitchens

How To Give Your Kitchen A Refresh Kashian Brothers

Diy Cabinet Refacing Budget Friendly Made Easy Wisewood

Updating A 90s Kitchen Without Painting Cabinets

Updating A 90s Kitchen Without Painting Cabinets
Related Posts