Replacing a kitchen sprayer can be a daunting task, but with the right tools and some basic knowledge of plumbing, you can easily do it yourself. In this article, we’ll cover the basics of replacing a kitchen sprayer and discuss the different types of sprayers available.
Tools You’ll Need to Replace a Kitchen Sprayer
Before you get started, you’ll need to make sure you have the right tools for the job. Here is a list of the basic tools and materials you’ll need:
- Adjustable wrench
- Pipe wrench
- Screwdriver
- Plumber’s tape
- Replacement kitchen sprayer
Step-by-Step Guide to Replacing a Kitchen Sprayer
Now that you have all the tools and materials you need, let’s look at the steps you’ll need to take to replace a kitchen sprayer.
Step 1: Turn Off the Water Supply
The first thing you need to do is turn off the water supply to the kitchen sprayer. This can usually be done from the main water valve or from an individual valve near the sink. Once the water is off, turn on the sprayer to make sure it doesn’t leak.
Step 2: Disconnect the Old Sprayer
Next, you’ll need to disconnect the old sprayer. First, use an adjustable wrench to loosen the mounting nut that holds the sprayer in place. Then, use a pipe wrench to loosen the connection at the base of the sprayer. Finally, remove the old sprayer and discard it.
Step 3: Install the New Sprayer
Now it’s time to install the new sprayer. Start by wrapping some plumber’s tape around the threads of the new sprayer. Then, use the adjustable wrench to secure the new sprayer in place. Finally, connect the new sprayer to the water supply using the pipe wrench.
Step 4: Turn the Water Supply Back On
The last step is to turn the water supply back on. Make sure to turn it on slowly to avoid any sudden pressure that could cause damage to the new sprayer. Once the water is running smoothly, you can turn off the sprayer and you’re done!
Types of Kitchen Sprayers
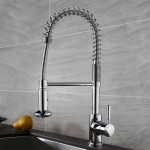
Now that you know how to replace a kitchen sprayer, let’s look at the different types available. There are two main types of kitchen sprayers: pull-out sprayers and side-mounted sprayers. Pull-out sprayers are connected directly to the faucet and can be pulled out of the faucet when needed. They are usually mounted on a hose and have an adjustable sprayer head. Side-mounted sprayers are mounted on the side of the sink and usually have a single sprayer head. No matter which type of kitchen sprayer you choose, replacing one is a relatively simple task. Just make sure to turn off the water supply, disconnect the old sprayer, install the new sprayer, and turn the water back on. With the right tools and a bit of knowledge, you can easily replace a kitchen sprayer in no time at all.


Related Posts


