How to Paint Kitchen Cabinets DIY
Painting kitchen cabinets is a popular DIY project that can transform the look of a kitchen without the expense of replacing them entirely. With careful planning and execution, anyone can achieve professional-looking results. This article provides a step-by-step guide to painting kitchen cabinets, covering essential tools, preparation techniques, and painting tips.
1. Preparation is Key
Before embarking on the painting process, thorough preparation is crucial. The success of the final paint job hinges on a smooth and clean surface. This includes:
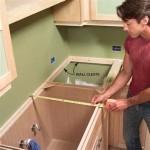
- Remove cabinet doors and hardware: This allows for easier cleaning and painting of all surfaces.
- Clean the cabinets: Use a degreaser or trisodium phosphate (TSP) solution to remove grease, grime, and any existing finishes. Afterwards, rinse thoroughly and let them dry completely.
- Sanding: Sanding smooths out any rough spots and creates a better surface for the paint to adhere to. Use a fine-grit sandpaper (120-180 grit) and sand all surfaces lightly.
- Fill any gaps or holes: Use wood filler to fill any imperfections, such as scratches, dents, or nail holes. Allow the filler to dry completely before sanding smooth.
- Prime the cabinets: A primer provides a smooth, even surface for the paint and helps it adhere better. Apply a coat of primer using a brush or roller, ensuring even coverage. Allow the primer to dry completely before applying paint.
2. Choosing the Right Paint
Selecting the appropriate paint is vital for achieving a durable and long-lasting finish. Consider the following factors:
- Type of paint: Choose a paint specifically designed for cabinets, such as acrylic latex or oil-based paint. Acrylic latex is a popular choice for its durability, ease of use, and quick drying time. Oil-based paint provides a harder finish and better resistance to moisture but can be more difficult to clean up.
- Finish: Determine the desired finish for your cabinets. Matte finishes hide imperfections, while semi-gloss or high-gloss finishes provide a more polished look and are easier to clean.
- Color: Select a paint color that complements the overall style of your kitchen and personal preferences.
3. Painting Techniques
Once the cabinets are prepped and the paint is chosen, follow these steps for a successful paint job:
- Apply thin coats: Apply multiple thin coats of paint rather than one thick coat. This allows the paint to dry evenly and prevents drips and runs.
- Use a high-quality brush or roller: Choose a brush or roller specifically designed for painting cabinets. A good quality brush or roller ensures smooth and even application.
- Paint in smooth strokes: Apply paint in long, smooth strokes, avoiding harsh brushstrokes. This minimizes brush marks and creates a consistent finish.
- Let each coat dry completely: Allow each coat of paint to dry thoroughly before applying the next coat. This ensures proper adhesion and prevents the paint from smudging.
- Clean up immediately: Clean any spills or drips promptly to prevent paint from drying and becoming difficult to remove.
Painting kitchen cabinets can be a rewarding DIY project that adds a fresh and updated look to the kitchen. With careful preparation, the right paint, and proper techniques, anyone can achieve professional-looking results and enjoy their newly painted cabinets for years to come.

How To Prep And Paint Kitchen Cabinets Lowe S

How To Paint Kitchen Cabinets Without Sanding Or Priming

A Diy Project Painting Kitchen Cabinets

Diy Painting Your Kitchen Cabinets The Right Way

How To Paint Kitchen Cabinets Budget Friendly Makeover

20 Diy Painted Kichen Cabinet Ideas A Cultivated Nest

Pa Wedding Photographer Diy Painted Kitchen Cabinets Before After

How To Paint Kitchen Cabinets Diy Makeover

How To Paint Kitchen Cabinets Without Sanding Sustain My Craft Habit

How To Paint Kitchen Cabinets In 7 Simple Steps
Related Posts